The other day, I ran into a problem draining a pool filled with old water. Siphoning it off with an old garden hose would be easy, but I didn't really want to use my lungs to start it. There were bird feathers floating in the water.
So I started it from the other end. I just used a second garden hose (hooked up to a spigot). I held both hoses together under the water and filled the siphon tube up with running water. Then I separated the hoses underwater. The momentum of the running water will be enough to continue the siphon.
That way at least, you aren't greeted at the other end, by a face full of old bird-bath water. :)
Friday, July 10, 2009
Thursday, July 9, 2009
Windows and Linux security comparison
I use two operating systems: Windows XP and Ubuntu Linux. I still use Windows XP to develop for Microsoft's .Net platform. If I had my choice, I'd never touch Windows with a ten-foot pole.
Here's a short comparison of the unpatched security holes in the operating systems. (These security reports are updated daily).
Code Red: Windows XP ("extremely critical" rating as of 7/9/2009!):
http://secunia.com/advisories/product/22/

Code Yellow-Green: Windows Vista ("less critical" rating as of 7/9/2009!):
http://secunia.com/advisories/product/13223/

Ubuntu Linux 9.04 (no unpatched security holes as of 7/9/2009):
http://secunia.com/advisories/product/21851/

This snapshot is a fairly common view of the three systems. Also, it's worth pointing out, these security holes didn't just pop up. They've been sitting out there the whole time (hopefully unknown) since the release of the software.
Well, now Windows XP is asking me to restart my computer. I'm NOT joking. :)
Here's a short comparison of the unpatched security holes in the operating systems. (These security reports are updated daily).
Code Red: Windows XP ("extremely critical" rating as of 7/9/2009!):
http://secunia.com/advisories/product/22/
Code Yellow-Green: Windows Vista ("less critical" rating as of 7/9/2009!):
http://secunia.com/advisories/product/13223/
Ubuntu Linux 9.04 (no unpatched security holes as of 7/9/2009):
http://secunia.com/advisories/product/21851/
This snapshot is a fairly common view of the three systems. Also, it's worth pointing out, these security holes didn't just pop up. They've been sitting out there the whole time (hopefully unknown) since the release of the software.
Well, now Windows XP is asking me to restart my computer. I'm NOT joking. :)
Tuesday, July 7, 2009
Making DVD backups with Ubuntu Linux 9.04
Note: Despite the threats and FBI warnings at the beginning of a movie, you are allowed to make one copy of every movie you own. It's known as Fair Use. Just don't sell the movies or make hundreds of copies.
Installing the software:
I'd recommend two packages:
Installing k9copy and brasero isn't too tricky (both are free and in the Ubuntu repositories) . Except you may also need to install ubuntu-restricted-extras (in the Ubuntu repos) and a library libdvdcss2 (from medibuntu repos). The latter will allow reading encrypted discs. For help with Medibuntu repos see: https://help.ubuntu.com/community/Medibuntu
Anyway, after that is installed, it's pretty easy to make backups. I just made a backup of a scratchy disk we got second hand. The disk looked like it was on it's last leg.
Overview
Basically, you insert a DVD, use k9copy to select the titles you want copied, and save it to an iso file. Then use Brasero to burn the iso to another DVD disc. Here are more detailed steps:
Create an iso file from DVD:
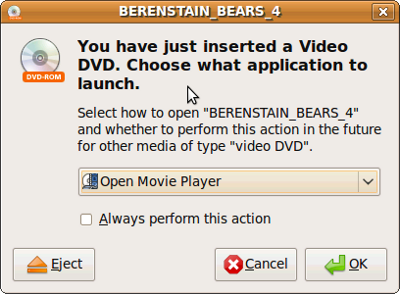
1. Put a DVD in the dvd reader drive. The first time you do this on a new system, you well get a pop up that asks if you want to watch the movie. You can click cancel, or set your preference to "do nothing" when a disk is inserted.
2. Click: Applications -> Sound & Video -> k9copy

3. Click "Open"
 If no Title information pops up, the app is probably looking at the another CD/DVD drive. There's a drop down to change this, or you can just remove the disk and try the other drive.
4. Check the first box under Title (to copy all of the dvd). I believe if you want, you can copy a specific chapter/part of the DVD.

5. Click "Copy"

6. Name and save the file.

It will rip:
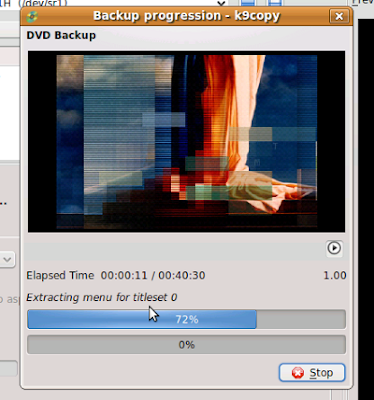
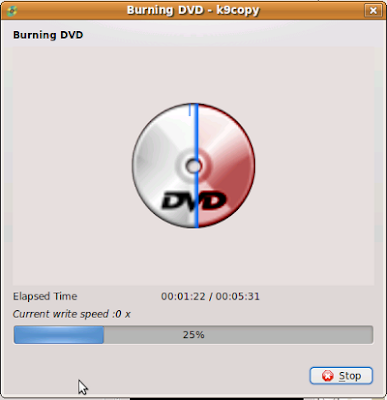
And save to an iso. Note when it's finished ripping the DVD, it will say "Burning DVD." It means: writing the ISO file. It's not actually burning anything. The terminology is misleading.
7. Click "Eject" in k9copy when it is done.
That's all for the iso. Remember where you saved the file. :)
Burning DVDs from iso file:
1. Insert a blank writable DVD disc. Again, cancel any popups, or set your preferences to "do nothing" when putting in media.
2. Click: Applications -> Sound & Video -> Brasero Disc Burner
3. Click "Burn image"

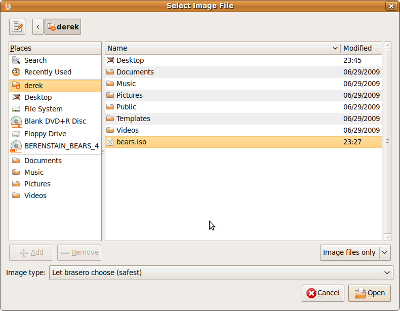
4. Click Select image, and browse to your file, click "open"

5. Click "burn."
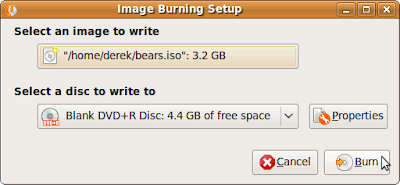
This will burn it. On the drive I'm testing, it takes about ten minutes total.
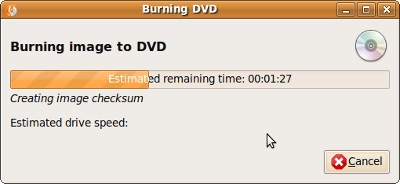

And that's it. You have a DVD backup that should play in any standard player.
I also noticed if you right-click on an iso file, it will give the option of burning it to disc. I haven't used that feature, but I'm sure that would work as well. I just liked Brasero. If you get a warning that the disc was "corrupted" there's probably no need to pitch a disc and re-burn, unless the disc is completely unplayable. A few bad 1 and 0's out of 4GB of audio/video data probably won't be humanly detectable.
Installing the software:
I'd recommend two packages:
- k9copy for the ripping the DVD to an iso file, and
- Brasero for burning it to DVD.
Installing k9copy and brasero isn't too tricky (both are free and in the Ubuntu repositories) . Except you may also need to install ubuntu-restricted-extras (in the Ubuntu repos) and a library libdvdcss2 (from medibuntu repos). The latter will allow reading encrypted discs. For help with Medibuntu repos see: https://help.ubuntu.com/community/Medibuntu
Anyway, after that is installed, it's pretty easy to make backups. I just made a backup of a scratchy disk we got second hand. The disk looked like it was on it's last leg.
Overview
Basically, you insert a DVD, use k9copy to select the titles you want copied, and save it to an iso file. Then use Brasero to burn the iso to another DVD disc. Here are more detailed steps:
Create an iso file from DVD:
1. Put a DVD in the dvd reader drive. The first time you do this on a new system, you well get a pop up that asks if you want to watch the movie. You can click cancel, or set your preference to "do nothing" when a disk is inserted.

2. Click: Applications -> Sound & Video -> k9copy

3. Click "Open"
 If no Title information pops up, the app is probably looking at the another CD/DVD drive. There's a drop down to change this, or you can just remove the disk and try the other drive.
4. Check the first box under Title (to copy all of the dvd). I believe if you want, you can copy a specific chapter/part of the DVD.

5. Click "Copy"

6. Name and save the file.

It will rip:

And save to an iso. Note when it's finished ripping the DVD, it will say "Burning DVD." It means: writing the ISO file. It's not actually burning anything. The terminology is misleading.

7. Click "Eject" in k9copy when it is done.

That's all for the iso. Remember where you saved the file. :)
Burning DVDs from iso file:
1. Insert a blank writable DVD disc. Again, cancel any popups, or set your preferences to "do nothing" when putting in media.
2. Click: Applications -> Sound & Video -> Brasero Disc Burner
3. Click "Burn image"

4. Click Select image, and browse to your file, click "open"


5. Click "burn."

This will burn it. On the drive I'm testing, it takes about ten minutes total.


And that's it. You have a DVD backup that should play in any standard player.
I also noticed if you right-click on an iso file, it will give the option of burning it to disc. I haven't used that feature, but I'm sure that would work as well. I just liked Brasero. If you get a warning that the disc was "corrupted" there's probably no need to pitch a disc and re-burn, unless the disc is completely unplayable. A few bad 1 and 0's out of 4GB of audio/video data probably won't be humanly detectable.
Saturday, July 4, 2009
Spearmint oil
I ran a first test batch distilling spearmint.
I packed the top of the lid with mint, and ran it for about a half hour on medium. I ended up tying the lid down on the home-made distiller, to prevent steam leaks. I packed this fairly tight, so it actually backed up a little pressure pushing the steam through the mint (less pressure to push through the sides).
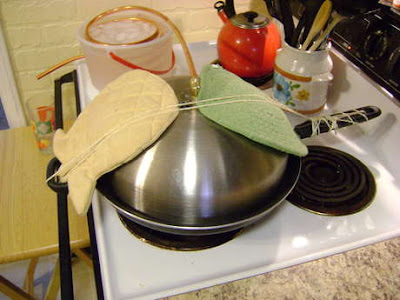
I just collected the distillate in a normal glass.
Really though, what would be ideal, would be a bottle with a very long, narrow neck, that could allow excess water to be drained off from the bottom. That way, the oil would separate cleanly, and not bead up. If it beads up, it's going to be hard to pull it off the top with a dropper.
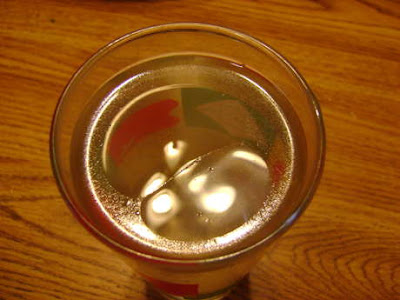
The spearmint oil floating on top of the distillate. It's beading up. This would be enough to flavor several hundred toothpicks. Just dip the toothpicks in cup, and it will pick up the oil. It's extremely strong.
Also, I used a medicine dropper to pull up the oil, and ended up with 2 ml from one small bunch of spearmint. I suppose if I distilled all the mint, I'd end up with a small bottle. A little goes a long way though.
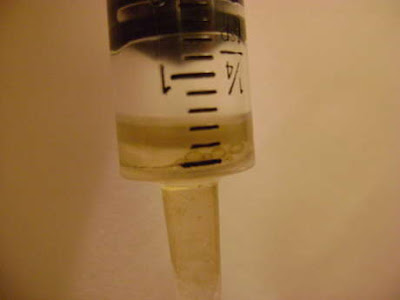
You'll need a little air in there to push the oil out (floating on top). You can discard the water (at bottom).
I packed the top of the lid with mint, and ran it for about a half hour on medium. I ended up tying the lid down on the home-made distiller, to prevent steam leaks. I packed this fairly tight, so it actually backed up a little pressure pushing the steam through the mint (less pressure to push through the sides).

I just collected the distillate in a normal glass.
Really though, what would be ideal, would be a bottle with a very long, narrow neck, that could allow excess water to be drained off from the bottom. That way, the oil would separate cleanly, and not bead up. If it beads up, it's going to be hard to pull it off the top with a dropper.

The spearmint oil floating on top of the distillate. It's beading up. This would be enough to flavor several hundred toothpicks. Just dip the toothpicks in cup, and it will pick up the oil. It's extremely strong.
Also, I used a medicine dropper to pull up the oil, and ended up with 2 ml from one small bunch of spearmint. I suppose if I distilled all the mint, I'd end up with a small bottle. A little goes a long way though.

You'll need a little air in there to push the oil out (floating on top). You can discard the water (at bottom).
Drying spearmint
Spearmint will fill up the whole yard if you let it. It grows like crazy, and will choke just about everything else out.
The wall of mint. :)
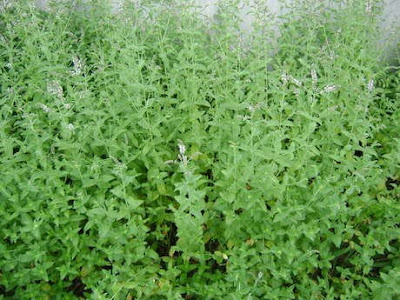
I cut handful to dry (cutting at least 2/3 of the plant off). I stripped off lower leaves, then tied them together with twine. Also, I flattened the bundle out (like a "Japan fan") so that it dries more evenly.
You want to cut it right as it's budding. That's when the essential oils are at the peak. In general, I think that's true of any herb. On mint, if you wait till it flowers, the plant will lose some of the potency. Also, you don't want to wait too long; the tiny seeds are are to some degree toxic (though I'm not sure how many you'd have to eat to get sick).
Also most things I've read recommend cutting it early in the day before the sunlight beats down on it. The light will reduce some of the essential oils.
 Hang it upside-down away from sunlight in a well ventilated room. The oils in the stem will flow down into the leaves, when drying.
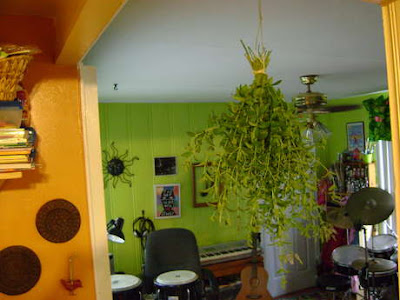
It takes a few days to dry.
The wall of mint. :)

I cut handful to dry (cutting at least 2/3 of the plant off). I stripped off lower leaves, then tied them together with twine. Also, I flattened the bundle out (like a "Japan fan") so that it dries more evenly.
You want to cut it right as it's budding. That's when the essential oils are at the peak. In general, I think that's true of any herb. On mint, if you wait till it flowers, the plant will lose some of the potency. Also, you don't want to wait too long; the tiny seeds are are to some degree toxic (though I'm not sure how many you'd have to eat to get sick).
Also most things I've read recommend cutting it early in the day before the sunlight beats down on it. The light will reduce some of the essential oils.
 Hang it upside-down away from sunlight in a well ventilated room. The oils in the stem will flow down into the leaves, when drying.
It takes a few days to dry.
Friday, July 3, 2009
Bulding an essential oil distiller
Well, I've finally built a simple steam distiller. I was kind of shocked at how much people are selling distillers for. I mean even the cheapest ones are like $300 - $400 dollars. Large ones are thousands.
Here's how to build an inexpensive steam distiller for about $20 (not including tools).
I'll use this on my massive spearmint garden -- maybe I will get a couple drips of essential oil to show for it :)
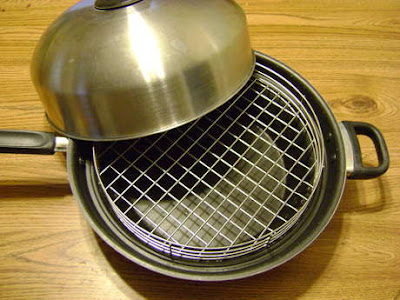
As the steamer, I used an old Turbo Cooker. You might be able to run across an old one for a couple bucks. Something like will work, because the metal tray will hold the mint just above the boiling water, and all the steam will pass through it. Excess water in the mint will just drip back down into the bottom.
Or you can find an old pressure cooker. Really pressure cookers are ideal as a base, because they are designed to seal tight, and have a hole at the top as well.
There then needs to be a way to cool the steam, so that it condenses into oil and hydrosol (the water part that is collected). The essential oil will float on top. Basically, just run tubing through ice water. Then the oil can be picked up with a dropper.
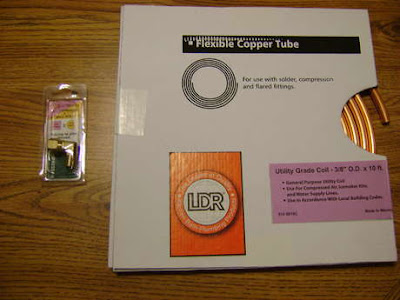
For tubing, I used 10 feet of 3/8" diameter copper tubing (used for ice makers, refrigerators). I got a 3/8" COMP x 1/4" MIP compression-elbow-fitting to connect it to the top. The copper pipe will fit snugly in one end, and I just planned on screwing the fitting into the top of the Turbo Cooker lid. This was about $15 (got it at a farm supply store Rural King).
Then I used an old ice cream container, for cooling the steam. This will just be filled with ice-water, to cool the tubing:
 I took off the top, and there were two holes:
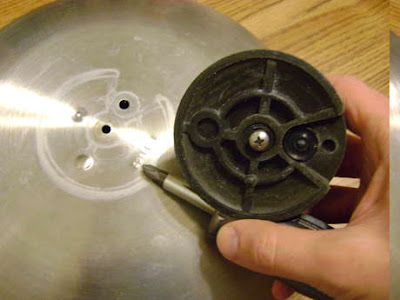
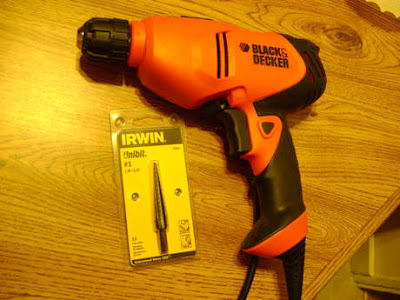
For the one in the center, I used a unibit to open it up to 15/32", so that the elbow fitting would screw in tightly. I really like the unibit, because you can just find the snug fit by trial and error. Plus it saved having to keep changing drill bits. I got this separately from a hardware store (Ace, or Harbor Freight is cheaper).
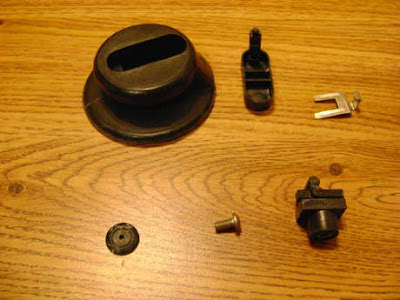
To plug the other hole, I cannibalized the top part, and pulled out a rubber washer and small bolt. (To dissemble, the whole top comes apart if you pull off the washer).
I used the unibit on the washer, so that it would thread tightly onto the bolt. I would have used rubber on more parts, but wasn't sure if what I saw in the store would take high temperatures without melting.
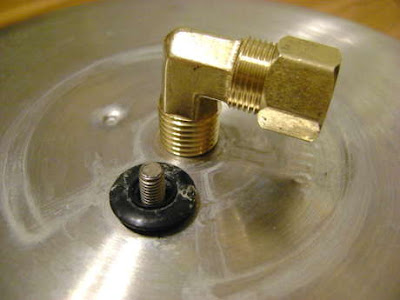
With both parts connected, the top basically looks like:
Again, I used the unibit to drill a 3/8" hole in the ice-cream container. I coiled the copper wire tighter by hand, just molding it into a helix with two long ends. After I fed it through the ice-cream container, I put a little silicone around the hole to seal it. This part will never come in contact with the oils; it's just for cooling (holding the ice-water). Also, of course, don't let the hot copper tube come in contact with the plastic. The copper and plastic are only touching at the bottom.
The tubing connects to the compression fitting like:

Here's the finished setup:
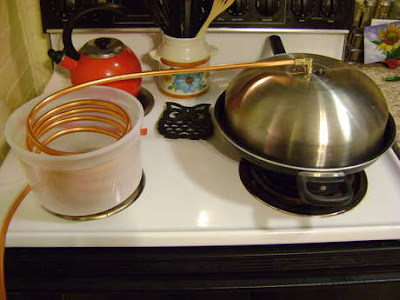
I will probably tie the lid down tighter with something fire-resistant. That will force most all the steam through the top. To prep it all, I just ran clean water through the tubing with the lid upside down and checked for any leaks. If there are any, I would just put nuts on both top/bottom side of the threads, with rubber washers that won't melt.
I'll run a test batch tomorrow. Most things I've read recommend drying plants before distilling though -- because you can put more plant material in the distiller. It's optional though. Also, it's probably worth noting that in terms of herbs in general: some extracts are fairly potent (meaning toxic) when concentrated. Extracts should be handled with care.
Of course, I imagine I could probably go online and buy a gallon of mint oil for the same price as the home-made distiller cost. Although I can produce all sorts of flavors now. :)
Here's how to build an inexpensive steam distiller for about $20 (not including tools).
I'll use this on my massive spearmint garden -- maybe I will get a couple drips of essential oil to show for it :)
As the steamer, I used an old Turbo Cooker. You might be able to run across an old one for a couple bucks. Something like will work, because the metal tray will hold the mint just above the boiling water, and all the steam will pass through it. Excess water in the mint will just drip back down into the bottom.
Or you can find an old pressure cooker. Really pressure cookers are ideal as a base, because they are designed to seal tight, and have a hole at the top as well.

There then needs to be a way to cool the steam, so that it condenses into oil and hydrosol (the water part that is collected). The essential oil will float on top. Basically, just run tubing through ice water. Then the oil can be picked up with a dropper.
For tubing, I used 10 feet of 3/8" diameter copper tubing (used for ice makers, refrigerators). I got a 3/8" COMP x 1/4" MIP compression-elbow-fitting to connect it to the top. The copper pipe will fit snugly in one end, and I just planned on screwing the fitting into the top of the Turbo Cooker lid. This was about $15 (got it at a farm supply store Rural King).

Then I used an old ice cream container, for cooling the steam. This will just be filled with ice-water, to cool the tubing:
 I took off the top, and there were two holes:
For the one in the center, I used a unibit to open it up to 15/32", so that the elbow fitting would screw in tightly. I really like the unibit, because you can just find the snug fit by trial and error. Plus it saved having to keep changing drill bits. I got this separately from a hardware store (Ace, or Harbor Freight is cheaper).

To plug the other hole, I cannibalized the top part, and pulled out a rubber washer and small bolt. (To dissemble, the whole top comes apart if you pull off the washer).
I used the unibit on the washer, so that it would thread tightly onto the bolt. I would have used rubber on more parts, but wasn't sure if what I saw in the store would take high temperatures without melting.

With both parts connected, the top basically looks like:

Again, I used the unibit to drill a 3/8" hole in the ice-cream container. I coiled the copper wire tighter by hand, just molding it into a helix with two long ends. After I fed it through the ice-cream container, I put a little silicone around the hole to seal it. This part will never come in contact with the oils; it's just for cooling (holding the ice-water). Also, of course, don't let the hot copper tube come in contact with the plastic. The copper and plastic are only touching at the bottom.
The tubing connects to the compression fitting like:

Here's the finished setup:

I will probably tie the lid down tighter with something fire-resistant. That will force most all the steam through the top. To prep it all, I just ran clean water through the tubing with the lid upside down and checked for any leaks. If there are any, I would just put nuts on both top/bottom side of the threads, with rubber washers that won't melt.
I'll run a test batch tomorrow. Most things I've read recommend drying plants before distilling though -- because you can put more plant material in the distiller. It's optional though. Also, it's probably worth noting that in terms of herbs in general: some extracts are fairly potent (meaning toxic) when concentrated. Extracts should be handled with care.
Of course, I imagine I could probably go online and buy a gallon of mint oil for the same price as the home-made distiller cost. Although I can produce all sorts of flavors now. :)
Subscribe to:
Comments (Atom)