Tuesday, February 22, 2022

Blocking a Stratocaster tremolo

Here's a quick project where I blocked the tremolo (whammy bar) on a Stratocaster using basic tools.

This will lock the tremolo in place, which generally should improve tuning stability and sustain.  It's also easily reversible.  (With a floating bridge, bending a string will detune all other strings).

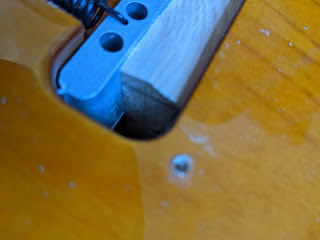
The basic idea of this mod is to cut a wedge of wood to fit inside the tremolo cavity.

Supplies used:

  • A piece of hardwood, such as maple or ash
  • Philips screwdriver
  • note cards
  • Ruler (or calipers)
  • Coping saw
  • Belt sander (and gloves)
  • Workbench/vice

I used a 2 inch block of rock maple.  Hardwood helps transfer vibration from the bridge to the body.

Step 1.  "Deck" the tremolo.  

Tighten the screws on the springs so that the bridge sits flat on the guitar body.  Loosen the strings while making adjustments on the screws.  Ideally you need just enough tension to counteract the string tension (where still it's possible to drop pitch).  Avoid using excessive string tension, which could indent the wood over time.

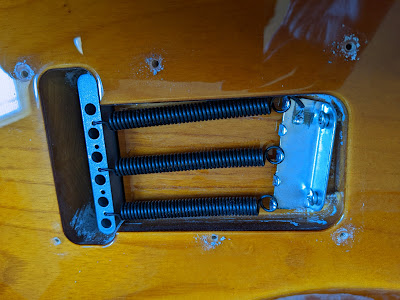
It's curious that the springs were angled when I took off the back plate.  I would think parallel would be more stable.

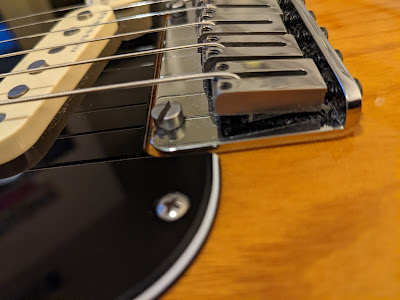
Also, lower the two screws on the top of the bridge.  A decked bridge will lay flat against the body. 


One nice thing about having the bridge parallel with the strings is that intonation adjustments are simple.  Otherwise with a Fender floating bridge, adjusting the intonation slightly affects the height of a string (and vice versa). 

Step 2. Measure the inside of the tremolo cavity.  It's a little tricky to measure the inside of the cavity. Calipers were a bit awkward, so I just cut some note cards to create a temporary shim to fill the shape of the hole.  I packed the cavity with cards, then removed the cards and measured the size of the compressed stack (careful not to lose the shape).

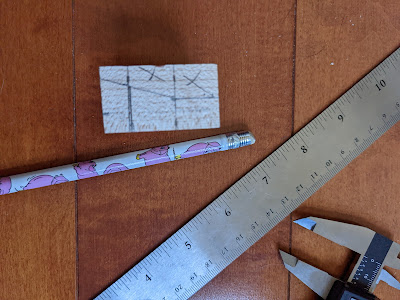
For example in my case the measurements were roughly:

  • 1.6 cm thickness at 1.5 cm
  • 1.1 cm thickness at 3 cm
  • Total length 3.8 total length

After marking out the shape on the wood (on all sides), you can double check the measurements by again forming a temporary shim from the stack of note cards, aligned with the cut lines.

Step 3.  I rough-cut the shape with a coping saw and finished a simple wedge shape on a belt sander.


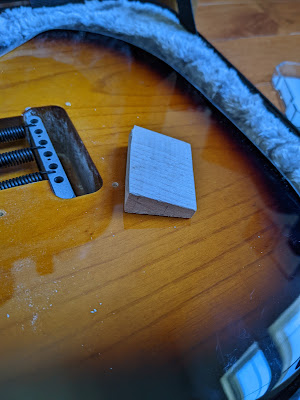
Step 4. Test the fit of the shape, rocking it into place for a snug fit, or sanding for adjustments.  


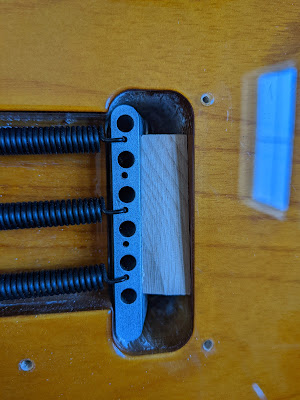
You can leave the back plate off, in case you want easily remove the block and raise the bridge screws a hair.  Since the tremolo is decked, it can still be used to drop the pitch of the strings.

Here's a recording using the Stratocaster (on both rhythm and lead parts):

https://soundcloud.com/red-squirrel-one/dark_planet-mp3?utm_source=clipboard&utm_medium=text&utm_campaign=social_sharing

Saturday, March 21, 2020

Guitar Scales - Explained!

This post will explain how to see the simple pattern in the guitar fretboard.

Part 1:


At first glance, this probably looks fairly confusing, with no obvious pattern:


But, there's only one simple pattern for all diatonic (do-re-mi) scales.

First keep these things in mind: 

  • The key is to think about playing *three* notes per string.
  • The second key is to imagine that there is no "kink" in the guitar's tuning.  In other words, assume the guitar is tuned to 5 half-steps up for every string (also known as "perfect 4ths tuning"). 
  • Also, to show the entire pattern, lets assume we have a 7 string guitar.
Then, the general pattern for a diatonic scale would then look like this:

         (high string)

       |   | X |   | X | X |
       |   | X |   | X | R |
       |   | X | X |   | X |
low    |   | X | R |   | X |   high
frets  | X |   | X |   | X |   frets
       | R |   | X |   | X |
       | X |   | X |   | X |

         (low string)

Where "R" is the root of the scale.

Then the pattern repeats (across the strings).

If you are moving the pattern from low string to high strings, notice how the block of three notes inches up the fretboard:

  • Move the bottom note up a half-step.
  • Move the middle note up a half-step.
  • Move the top note up a half-step (and the pattern starts over).

So, the pattern's movement just boils down to the rule: bottom, middle, top.

And the pattern only has three shapes, based on the intervals:

        (high string)
               whole-step, half-step (repeat x 2)
               half-step, whole-step (repeat x 2)
               whole-step, whole-step (repeat x 3)
        (low string)

That's it!  All the diatonic scales, any position.

Wherever you are on the neck, any scale -- at any position -- will be some slice of that same one pattern.  Moving up or down the neck, just rotates where the pattern starts.

For example, if you play the C scale on open guitar strings, the low E string starts the pattern in the middle:

                   * pattern repeats
  |   | X |   | X | X |
  |   | X |   | X | R |
  |   | X | X |   | X |   < start here
  |   | X | R |   | X |
  | X |   | X |   | X |
  | R |   | X |   | X |
  | X |   | X |   | X |
    * pattern repeats


So if played on a guitar open strings (again, ignoring the "kink" in tuning):

F   X |   | X |   | X |
C   R |   | X |   | X |
G   X |   | X |   | X | < pattern
D   X |   | X | X |   |      repeated
A   X |   | X | R |   |
E   X | X |   | X |   |

Now, adding the "kink" in tuning for the high B and E strings, the pattern is always shifted up one half-step on the two high strings.   So the pattern now looks like:


E     | X |   | X |   | X |
B     | R |   | X |   | X |
G   X |   | X |   | X |   |
D   X |   | X | X |   |   |
A   X |   | X | R |   |   |
E   X | X |   | X |   |   |


So how do you know where to start the pattern?  Perhaps the simplest approach is to look at chord shapes for context clues on where the pattern is intersecting with the chord.  Also note the root notes in the pattern.

As you move the scale up the neck, you simply rotate where you start in the pattern sequence.  This block describes the entire fretboard, for the overlapping scale shapes, for example starting on "Pattern 1" and moving up the neck (ignoring the "kink" in tuning):

  |   | X |   | X | X |  < Pattern 2
  |   | X |   | X | R |  < Pattern 6
  |   | X | X |   | X |  < Pattern 3
  |   | X | R |   | X |  < Pattern 7
  | X |   | X |   | X |  < Pattern 4
  | R |   | X |   | X |  < Pattern 1
  | X |   | X |   | X |  < Pattern 5


So each time you shift up a position, in the scale, you rotate the same pattern by two cycles.  Moving the scale down the neck would similarly rotate the pattern in the opposite direction.

That last diagram explains all diatonic scales shapes for the entire fretboard.  Or in other words, each pattern corresponds to a "mode" of the scale.  For example, pattern 2 is the Dorian mode.

If that is hard to visualize, just notice the scale also contains this wide, whole-step pattern:

  | | |X| |X| |X| |X|
  | | |R| |X| |X| | |
  |X| |X| |X| |X| | |

Everything else is joined to this big shape by half-steps.  Then, everything else on the neck is  just like fitting puzzle pieces together.  The repeating pattern will only snap onto one spot of the previous pattern.

There is also another nested pattern here.  If you look at the negative space of the diatonic scales, you will see the sharps/flats (like black keys on piano).  The black keys on the piano form pentonic scales.  The pentonic minor scale also follows a repeating pattern (ignoring the "kink" in tuning):


    * pattern repeats
  | R |   |   | X |  < 
Pattern 1
  | X |   |   | X |  < 
Pattern 4
  |   | X |   | X |  < 
Pattern 2
  |   | X |   | R |  < Pattern 5
  |   | X |   | X |  < Pattern 3
        * pattern repeats


In other words, starting from the low string:
  • start with a whole tone, and repeat this pattern on three strings.
  • drop the bass note a half-step, and repeat on two strings.
  • drop the top note a half-step, and the pattern repeats...
While the diatonic pattern is slowly moving up the neck, the pentonic pattern is slowly moving down the neck.

The diatonic pattern and pentonic pattern are inverses.  One fits inside the negative space of the other pattern (like white and black keys on a piano).  Similarly, moving to a different position of the scale just rotates the starting point of the pattern.

In general, to use these patterns it might be easier to "think" in "perfect 4ths tuning", and then project that pattern onto standard tuning.  Just remember the kink in standard tuning shift the pattern on the top two strings.

Or to experiment... tune your guitar to 5-half-steps up for every string ("perfect 4ths tuning").  Otherwise, standard tuning obscures the simplicity of the patterns.

Part 2:


Also, seeing a block shape is helpful for learning the notes of the entire fretboard.  For example notice that this scale pattern starts at the low E string, 1st fret:

  | | |F| |G| |A| |B|
  | | |C| |D| |E| | |
  |F| |G| |A| |B| | |


This block pattern repeats across the fretboard.  Memorizing the notes on the fretboard is not an easy task.  But instead of individually memorizing every note on the fretboard, you can instead memorize blocks of notes.  This "chunks" the information.  As an analogy, it's easier to remember 5 words, than 72 letters.  Then for example, you only have to remember where the C notes are on each string.

Though for me, it's not useful to try to memorize a large block of information using brute force.  I find it more useful to actually *play* a pattern of notes, and directly associate playing with the note name.

Special thanks to http://kwmonster.blogspot.com/ for helping make this post more clear.

Thursday, August 2, 2018

Simplest Quick Sort Algorithm

A lot of quicksort implementations are hard to follow, because the indexes are shifted around slightly (+1 or -1).  Here's the most intuitive implementation I could write:


# split an array into 3 groups around an arbitrary pivot value (last element):
# [ less than pivot ... equal to pivot ... greater than or equal to pivot ]
def partition(arr, low, high):
    # consolidate any elements smaller than pivot (last element)
    i = low 
    for j in range(low, high):
        if arr[j] < arr[high]:
            arr[i], arr[j] = arr[j], arr[i]
            i += 1 
    # drop pivot into position at middle 
    arr[i], arr[high] = arr[high], arr[i]
    return i

# main function
def quickSort(arr, low, high): 
    if low < high:
        pi = partition(arr, low, high)
        # now, resort new regions around pivot
        quickSort(arr, low, pi-1)
        quickSort(arr, pi+1, high)


Friday, February 5, 2016

Ubuntu Mate

I've been testing out Ubuntu Mate 15.10, and it may be my new favorite Linux distro for the desktop.   :-)

It's very simple and clean, and comes with various themes, such as Redmond (below), Cupertino (with a bottom dock), or Gnome (classic top/bottom panels).  It also includes a more advance menu that includes a search and favorites.


Wednesday, December 2, 2015

Edge/Collision Detection in ASCII character templates - Part 2

I experimenting with edge detection in ASCII characters, to use for manipulating text data (for example, creating mazes).

Here was Part I:  http://sevkeifert.blogspot.com/2015/11/i-wrote-that-turns-ascii-tessellation.html

Then I noticed that a lot of character patterns have implied white space, such as a pattern with pipes and underscores.  This pattern contains visual whitespace, but no actual whitespace character data:


So, here's an experiment to generalize the parser to handle cases like this.  The simplest approach I found was to add an option to  translate all characters into an exploded map of the data.  One character can translate to a block of 9 characters that represent the solid and non-solid properties of the font shape.  For example:


Then, the edge detection code works as usual, just in an exploded view of the ASCII data.


For example:

1. First transform text to exploded view
2. Parse as usual
3. Then apply an inverse transform to collapse back to normal.

The transform looks like:

Load template:

Apply Transform:


Apply pre-processing filters (sharpen edges)


Parse and apply post-processing filters


Apply inverse transform:


Then I added some code to detect the "outside" of a shape.  Also, I added pre and post image filtering rules, so loose edges like /_ can be automatically detected and closed.

Here's another example parsing implied whitespace in a template:


Parser Hints


Now, the parser can automatically detect inside/outside of closed shapes.

Also, I added a special character ~ that flags a region as closed within another shape (such as holes in the template).   The special character ` acts as non-useable whitespace.

summary:
    ~ means outside of shape
    ` means don't use whitespace

For example, to protect the closed shape of the eye, add a ~ inside of it:


Updated code at:

Python2: https://github.com/sevkeifert/text-utils/blob/master/maze-ify-ascii.py
Python3: https://github.com/sevkeifert/text-utils/blob/master/maze-ify-ascii-v3.py

Saturday, November 28, 2015

Irregular maze generator (from ASCII tessellation) - Part 1

I wanted to write a generalized ASCII maze generator which could create a unlimited variety of tessellations.  

So I first created a parser that could detect "edges" in an ASCII "image"


Then the script will knock out wall in the ASCII image to create a maze.


This can generate irregularly shaped mazes, based on the ASCII template.  

Source code is at:


Python2: https://github.com/sevkeifert/text-utils/blob/master/maze-ify-ascii.py

Python3: https://github.com/sevkeifert/text-utils/blob/master/maze-ify-ascii-v3.py


USAGE:


   maze-ify-ascii.py -f YOUR_TEMPLATE_FILE  


For example, here's a basic grid:


Grid with holes:


Oblique


Hexagonal tessellation:


Complex Features
Irregular shape, with holes, multiple regions, text, and protected whitespace


Now for Part II: parsing the space *inside* font characters:

Wednesday, November 25, 2015

Command line tool to create and parse text outlines - revisited


A while back I posted a quick script for creating text outlines on the command line (for example, in Vim).  I like keeping all my documentation as plain text.  I updated it so that it can now parse and repair outlines if you edit them.

Source code is here:

        https://github.com/sevkeifert/text-utils/blob/master/outline


Description of the `outline` utility:

This is a command line tool for creating text outlines from space-delimited
markup.  This program transforms a stream of data, either rendering markup or
decoding an already rendered outline back into markup.

                                                    Kevin Seifert - 2015 GPLv2
USAGE

    Pipe space-delimited (or space-delimited) text into this script to create a
    text outline.  For example:

        cat your_markup_file | $0

OPTIONS

    -d    decode outline
    -e    encode outline (default)
    -h    help
    -n    use numeric style: 1  1.1  1.2 ...
    -r    re-encode existing outline (repair)
    -w   set word wrap width
    -0    mix single/double space (add break after continued lines)
    -1    single space
    -2    double space

EXAMPLE USAGE

    cat yourfile | outline       # for roman numeral format
    cat yourfile | outline -n    # for decimal format
    cat yourfile | outline -d    # decode rendered outline back into markup
    cat yourfile | outline -r    # repair (re-encode) rendered outline

    Or in vim, visually select text and run selection markup through pipe

        :'<,'> ! outline
        :'<,'> ! outline -d
        :'<,'> ! outline -r

MARKUP EXAMPLE

    INPUT EXAMPLE (WHITESPACE DETERMINES LEVEL)

        some heading
            more text
                a sub point
                another sub point
            more text
                a sub point
                another sub point

    OUTPUT EXAMPLE (RENDERED INTO OUTLINE)

        I. some heading
            A. more text
                1. a sub point
                2. another sub point
            B. more text
                1. a sub point
                2. another sub point

    ALSO, YOU CAN USE DECIMAL FORMAT USING THE -n FLAG

        1. some heading
            1.1 more text
                1.1.1 a sub point
                1.1.2 another sub point
            1.2 more text
                1.2.1 a sub point
                1.2.2 another sub point