Saturday, July 4, 2009

Drying spearmint

Spearmint will fill up the whole yard if you let it. It grows like crazy, and will choke just about everything else out.

The wall of mint. :)


I cut handful to dry (cutting at least 2/3 of the plant off). I stripped off lower leaves, then tied them together with twine. Also, I flattened the bundle out (like a "Japan fan") so that it dries more evenly.

You want to cut it right as it's budding. That's when the essential oils are at the peak. In general, I think that's true of any herb. On mint, if you wait till it flowers, the plant will lose some of the potency. Also, you don't want to wait too long; the tiny seeds are are to some degree toxic (though I'm not sure how many you'd have to eat to get sick).

Also most things I've read recommend cutting it early in the day before the sunlight beats down on it. The light will reduce some of the essential oils.

Hang it upside-down away from sunlight in a well ventilated room. The oils in the stem will flow down into the leaves, when drying.


It takes a few days to dry.

Friday, July 3, 2009

Bulding an essential oil distiller

Well, I've finally built a simple steam distiller. I was kind of shocked at how much people are selling distillers for. I mean even the cheapest ones are like $300 - $400 dollars. Large ones are thousands.

Here's how to build an inexpensive steam distiller for about $20 (not including tools).

I'll use this on my massive spearmint garden -- maybe I will get a couple drips of essential oil to show for it :)

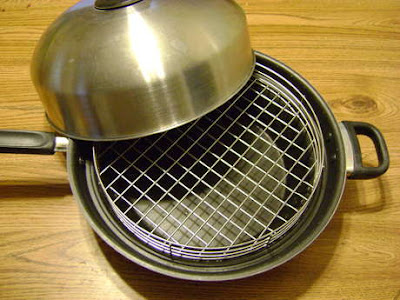
As the steamer, I used an old Turbo Cooker. You might be able to run across an old one for a couple bucks. Something like will work, because the metal tray will hold the mint just above the boiling water, and all the steam will pass through it. Excess water in the mint will just drip back down into the bottom.

Or you can find an old pressure cooker. Really pressure cookers are ideal as a base, because they are designed to seal tight, and have a hole at the top as well.

There then needs to be a way to cool the steam, so that it condenses into oil and hydrosol (the water part that is collected). The essential oil will float on top. Basically, just run tubing through ice water. Then the oil can be picked up with a dropper.

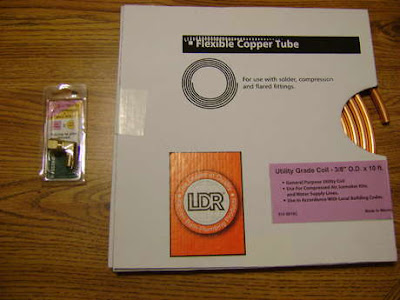
For tubing, I used 10 feet of 3/8" diameter copper tubing (used for ice makers, refrigerators). I got a 3/8" COMP x 1/4" MIP compression-elbow-fitting to connect it to the top. The copper pipe will fit snugly in one end, and I just planned on screwing the fitting into the top of the Turbo Cooker lid. This was about $15 (got it at a farm supply store Rural King).

Then I used an old ice cream container, for cooling the steam. This will just be filled with ice-water, to cool the tubing:

I took off the top, and there were two holes:
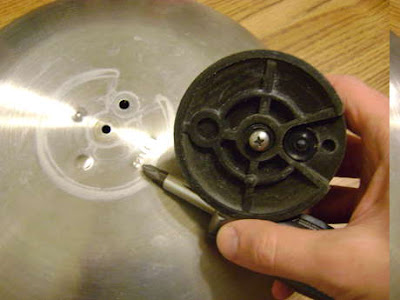

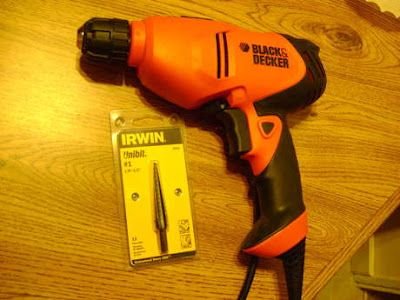
For the one in the center, I used a unibit to open it up to 15/32", so that the elbow fitting would screw in tightly. I really like the unibit, because you can just find the snug fit by trial and error. Plus it saved having to keep changing drill bits. I got this separately from a hardware store (Ace, or Harbor Freight is cheaper).


To plug the other hole, I cannibalized the top part, and pulled out a rubber washer and small bolt. (To dissemble, the whole top comes apart if you pull off the washer).

I used the unibit on the washer, so that it would thread tightly onto the bolt. I would have used rubber on more parts, but wasn't sure if what I saw in the store would take high temperatures without melting.
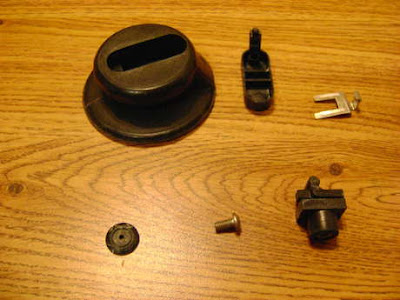

With both parts connected, the top basically looks like:
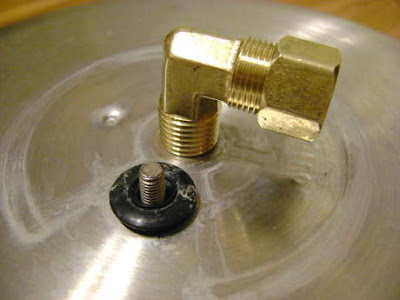

Again, I used the unibit to drill a 3/8" hole in the ice-cream container. I coiled the copper wire tighter by hand, just molding it into a helix with two long ends. After I fed it through the ice-cream container, I put a little silicone around the hole to seal it. This part will never come in contact with the oils; it's just for cooling (holding the ice-water). Also, of course, don't let the hot copper tube come in contact with the plastic. The copper and plastic are only touching at the bottom.

The tubing connects to the compression fitting like:

Here's the finished setup:
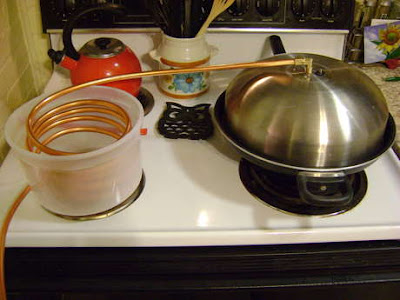

I will probably tie the lid down tighter with something fire-resistant. That will force most all the steam through the top. To prep it all, I just ran clean water through the tubing with the lid upside down and checked for any leaks. If there are any, I would just put nuts on both top/bottom side of the threads, with rubber washers that won't melt.

I'll run a test batch tomorrow. Most things I've read recommend drying plants before distilling though -- because you can put more plant material in the distiller. It's optional though. Also, it's probably worth noting that in terms of herbs in general: some extracts are fairly potent (meaning toxic) when concentrated. Extracts should be handled with care.

Of course, I imagine I could probably go online and buy a gallon of mint oil for the same price as the home-made distiller cost. Although I can produce all sorts of flavors now. :)


Saturday, June 20, 2009

How steam distillers work

I've been doing some research on stills, since my spearmint is budding and I was thinking of extracting the essential oils. Mint is great in tea, I think. Generally the peak time for harvesting essential oils from herbs is right before they are in bloom. Also, for mint at least, it's best to pick it in the morning, before the sun comes up. Sunlight will destroy some of the oils.

Making a still (steam distiller) is pretty simple.

To extract the oils you just force steam through the plant material. This steam will pick up the oils from the plant. Then cool the steam off, and it will turn back into liquids. For example route tubing coils through ice water. This separates into essential oils and water.

The tubing system looks something like

[ boiling water ] --> steam --> [ plant material ] --> steam --> [ cold coils ] --> condensed liquid --> [ oil/hydrosol collector] --> open air

It's important that the steam is not lost (holes in tubing, loose connections) because that's what's carrying the oil.

The safest materials for food, might be three sealed (Pyrex) glass containers. One container for water, one for the plant material, and one for the collector. Cork might be the best material for joining the tubing to the containers. Although I'm not sure the best material for the tubing. A lot of the designs I've seen use copper. But also I've heard copper is not ideal, because it can interact chemically with some essential oils. From what I can tell, the best materials would be all glass tubing, and using a blowtorch for shaping.

I happened to run across a video of a couple of Appalachian moonshiners on You-Tube. It's a similar process of steam distillation, provided they don't blown themselves up. :) (alcohol evaporates at a lower temp than water)

Saturday, June 13, 2009

Sculpey monsters

I was wondering about making bonsai pots out of Sculpey modeling clay. I tried a couple things, and ended up with an attack of Sculpey monsters instead!


I suppose that is the danger of Sculpey going horribly awry. :)

For standard bonsai pots, it would probably be easiest to press them between two molds.

Turning Weeds into Bonsai -- Maple

This time I was looking around for more trees around the fence. I found this Maple growing under a shrub. It had been protected from the mower for a long while, and is probably several years old. I trimmed it back a bit, and it had a nice shape, like a matured little tree.


After digging it up. I can see why maples are a used a lot bonsai. They have a mesh of tiny roots:


And transplanting it to a container for recovery:

I gave it a little superthrive (plant hormones). After it bounces back, I will trim it back a little more and put it in a smaller pot. I'd like to try an off-centered style for the growth.


Wednesday, June 3, 2009

Turning weeds into Bonsai


I noticed a mulberry tree growing along the fence in the back yard. I like mulberry trees (especially the berries) but it was just a bad location for it. For a couple years I chopped it off, but it kept growing back. I couldn't help but respect it's tenacity. Also I admired how ugly it was looking... so thought it would make a perfect bonsai.

To dig it up, I used a small spade, and carefully dug all the dirt out around it. I got down to roots that were about 1/4 inch in diameter, and then pulled it the rest of the way out. I didn't think it would survive a major pruning, so I put it in a temporary pot, to recuperate. Whenever you repot a plant, it destroys the little hairlike root fibers that are responsible for taking up moisture and nutrients.


It's crucial to keep the plant well watered since it's going to have a hard time getting water (until the roots can heal). After a day or so, most all the leaves on the plant dried up and died. I figured it would pull through though, since I had been chopping the thing to the ground for years.


Within a week or so, new growth reappeared. I'll keep this in the normal pot for a few months, then do a major pruning on the roots and branches, to force it into a smaller bonsai container. It's already looking like a weathered and ancient tree. I was think of exposing more of the roots, and wrapping them around some rocks.

Saturday, May 16, 2009

Fire Act - ALEGRIA (Cirque du Soleil)

I've heard about Cirque du Soleil for a few years, but never saw any clips from any shows. For some reason I thought they were more of a comedy act. I finally got around to tracking down some clips on YouTube. It amazes me how someone can master acrobatics like this: