I've heard about Cirque du Soleil for a few years, but never saw any clips from any shows. For some reason I thought they were more of a comedy act. I finally got around to tracking down some clips on YouTube. It amazes me how someone can master acrobatics like this:
Saturday, May 16, 2009
Wednesday, May 13, 2009
Small Linux utiltity for downloading camera images
On Linux, there's a couple programs for downloading pictures off a digital camera (like fspot). Although these apps feel too heavyweight -- and they have too many features I don't want, and not the features I do want.
What I want, is something that automatically downloads pictures off my camera when I plug it in. I don't want a GUI. Also, I'd like to be able to insert post-processing commands... like making a resized (smaller) copy of the image that I can email or post on a web page. The originals are too big to use for anything except archiving.
Fortunately, my camera just connects as a standard USB drive, so a simple bash script would work. Here's one I've written for Ubuntu 8.10 ... should work for later versions as well.
#!/bin/bash

#2008 GPL

#### ABOUT ####
# the sony cybershot camera connects as a standard removable drive
# this script copies pics off the camera and processes images
# for example, create resized copies for web/email around 50k each

#### REQUIRED ####
# sudo apt-get install imagemagick
# then set this script to run under
# nautilus (gnome file browser) -> Edit -> Preferences -> Media -> Photos
# otherwise, you may set up a udev rule
# don't forget to give the script executable privileges

#### CONFIG SECTION ####
# set the directory where the images are at
# browse to this if you are not sure (after pluging in camera)
# this should be under /media/ somewhere
camdir=/media/disk/DCIM/101MSDCF

# where pics will copy to the local hardrive:
picdir=~/Pictures/original

# where the resized pics will be copied:
resizedir=~/Pictures/resized

# file preview app:
imgbrowser=nautilus

# where operations will be logged:
log=/tmp/cameracopy-$(date +%F).log

#### IMAGE TRANSFER ####

echo "loading..." >> $log

# a folder containing links to all new files
new_files=$picdir/new

# a folder containing links representing
# the last known file structure on camera
# MAKE SURE THIS VARIABLE IS SET (used in rm)
camera_snapshot=$picdir/camera_snapshot

# all other files will be hashed by date in dirs
# global file hash for directories: year/month
HASH="+%Y/%m"

#### alt global file hash for directories: year/month/day
###HASH="+%Y/%m/%d"

# check output dirs
# create if needed
mkdir -p $picdir
mkdir -p $new_files
mkdir -p $camera_snapshot

# wait a little for camera to load in system
# check for existence of folder
while [[ ! -e $camdir  ]]
do
  echo "sleep" >> $log
  sleep 1
done

#### SYNC UP CAMERA TO LOCAL FILE SYSTEM ####
while read f
do
  if [[ ! -e "$camdir/$f" ]]
  then

    #double check camera still mounted
    if [[ ! -e "$camdir" ]]
    then
      echo "error: camera directory $camdir not mounted!" >> $log
      exit
    fi

    # remove out-dated links
    echo "old $camdir/$f" >> $log
    rm  "$camera_snapshot/$f"

  fi
done < <(find $camera_snapshot -type f -printf '%f\n')

#### TEST FOR NEW PICS ####
while read f
do

  # copy new pics from camera to local storage
  # and save reference to filename (link)
  if [[ ! -e "$camera_snapshot/$f" ]]
  then

    #double check camera still mounted
    if [[ ! -e "$camdir" ]]
    then
      echo "error: camera directory $camdir not mounted!" >> $log
      exit
    fi

    echo "new $camdir/$f" >> $log
    file_hash=$(date -r "$camdir/$f" $HASH)
    mkdir -p $picdir/$file_hash
    # copy or move, depending on whether you want pics left on camera
    cp "$camdir/$f" "$picdir/$file_hash/$f"
    # mv "$camdir/$f" "$picdir/$file_hash/$f"
    # save link to new images
    ln "$picdir/$file_hash/$f" "$new_files/$f"

  fi
done < <(find $camdir -type f -printf '%f\n')

echo "finished camera download" >>  $log

zenity --info --title="Download Complete" --text="All the pictures have been downloaded from the camera.  You may turn the camera off and unplug it.  Please wait while images are processed." &

#### POST IMAGE POCESSING ####

opened_viewer="0"

# test for new pics
while read f
do

  # hash files by create year/month
  # so number of files/dir is low
  file_hash=$(date -r "$new_files/$f" $HASH)
  mkdir -p $resizedir/$file_hash

  # open an image previewer to first resized pic
  if [[ $opened_viewer == "0" ]]
  then
    #proc_running=$( ps aux | grep "$resizedir/$file_hash" | grep -v grep )
    #if [[ $proc_running == "" ]]
    #then
      $imgbrowser $resizedir/$file_hash &
    #else
    #  echo "$imgbrowser already open" >>  $log
    #fi
    opened_viewer="1"
  fi

  # resize picture
  echo "resize to $resizedir/$file_hash/$f" >> $log
  convert -resize 460 -quality 60 \
         "$picdir/$file_hash/$f" "$resizedir/$file_hash/$f"


  #### PROCESS IMAGES ####
  # add more image processing here ...
  # link on hard drive is at $new_files/$f
  # actual file is at $picdir/$file_hash/$f
  #### PROCESS IMAGES ####


  # if processor slow
  #sleep 1

  # done with new files... move link to last known cam dir snapshot
  mv "$new_files/$f" "$camera_snapshot/"

done < <(find $new_files -type f -printf '%f\n')


echo "exit" >>  $log
exit
Thursday, January 1, 2009
Recording music with Ubuntu Linux (Intrepid Ibex)
Here's a quick tutorial on setting up Ubuntu Linux for recording audio. This is not hard to set up, but can be a little confusing if you don't do it every day.
1. Basic linux setup.
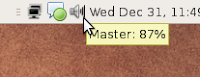
First off, you will need to turn on the audio capture for the "line in" or "microphone in" for your sound card, and of course, plug in your wires. The easiest way to get to the Linux mixer is to double click the little speaker icon at the top bar:
Then go to:
2. Now from synaptic or apt-get, install:
ardour (multi-track recorder),
jack-rack (a LADSPA effects rack), and
lame (mp3 converter)
In my opinion ardour is probably the best open source multi-track recorder for linux. My second favorite is traverso, although the interface is a little counter intuitive if you are used to something like ardour or cubase.
3. Now close any other programs which may be using the sounds card (like browsers, games, etc). You should be able to start Ardour, under the Applications group "Sound & Video".
Note: by default Ardour has a dark color scheme (which might make it a little hard to see where things are). To change to a lighter color scheme, you can go to (from the top menu bar):
For example:
Then you can select mono or stereo, depending on your input. Pick mono if you don't need stereo .. it will save disk space.
Also what the "Normal" and "Tape" mode means: in normal mode you can record multiple times on the same track. Overlapping clips in the same track are blended together, or can be moved independently. In tape mode, think of a tape recorder with one long continuous piece of tape. Whatever is recorded overwrites whatever was on the track. It's handy when mixing down (or bouncing) multiple tracks to a single stereo track. If you don't want to have to delete audio clips before re-recording.
The rest of the defaults are fine.
5. Now to actually record onto a track, it must be "armed." Otherwise, the tracks are protected from accidentally recording over them. To "arm" the track click on the little red circle on the leftmost end of the track:

Note the slider here controls the volume for playback (for quick mixing).
The "m" button "mutes" the track (during playback)
The "s" button "solos" the track, which is the inverse of mute (meaning you mute everything but that track)
If you press mute and solo together, your machine will blow up. Of course I'm just kidding :)
7. You should now be able to see the recording levels here (to the right of these buttons). If the signal is too loud you will see red clipping. Be sure to adjust the volume levels of the input sound, so that it's not too loud (distorted) or too quiet (not enough signal/noise).
8. Now the recording controls are similar to any standard tape recorder. Click the red circle and triangle to actually start recording onto the armed track. The square stops the recording.
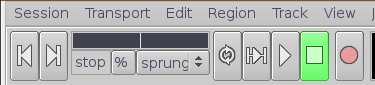
The "|<" returns the play head to the beginning of the recording. Or you can move the play head around with the scrubber (the horizontal slider in the picture above). Or you can click on the timecode to move the play head to a specific location.

9. Basic audio editing: You can trim, change the fade in/out, or move the clips around with the pointer tool selected (the little hand).
This is the default editing selection tool. The "|<->|" icon, next to the hand pointer, is another important mode. It is for selecting time ranges of one or more tracks. For example if you want to cut a whole clip, use the hand. If you want to cut a region out of the clip, use the range selector.
One of the most useful edits is under Edit -> Split Region. It will split a recorded clip into two regions that can be moved independently. Like scissors. Select the tracks of the audio that you want to split. You can select, as a general convention, multiple items by holding down the CTRL key and clicking on the track(s).
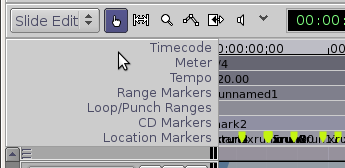
Also, note the "Markers" on the time line. Punch in/out and looping is especially handy. If you don't see a "Loop/Punch Ranges" heading in the Markers area, right click, and check "Loop/Punch."
Suppose that 98% of a take is good but contains a mistake in the middle. You can set a range containing the mistake and record only the few seconds of the track within the punch in/out range. This protects the rest of the track from recording over it.
To set up a punch in/out region, drag a region in the time line, and select "Set Punch Range":
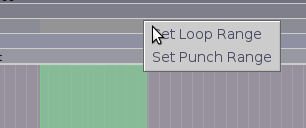
Then click the "Punch In" "Punch Out" buttons.
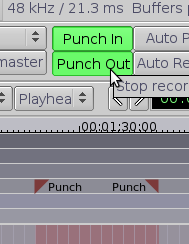
Click on the time line to position the playhead before the mistake. Then record as usual. The only section that will be recorded is the region within the punch markers. Click the punch in/out buttons again to turn off.
These simple edits should give you enough to mix down the "best-of" multiple takes and correct small mistakes.
10. After you record several tracks, you can do a initial mix (volume / pan) in the mixer window under:
Mixing is a matter of taste and pretty intuitive I think. The main (vertical) slider controls the volume of each track. The horizontal slider (at bottom) controls the left/right panning. The rest of the defaults should be fine.
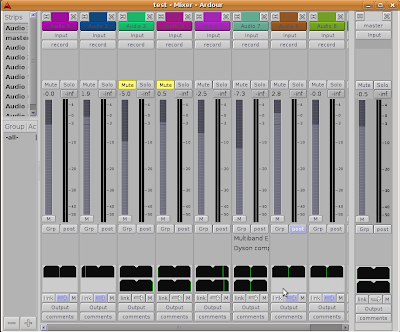
11. Post processing and effects. With jack-rack you can go to:
to look at the routing and add effects to particular tracks. To add an effect to a track, select the audio track (on the left)
Pre-fader and post-fader means the effect is inserted before and after your volume slider control (on the mixing board). To make things easiest, I prefer pre-fader effects, then I can control the overall volume with the fader.
Then right click. You will get the following options:

These are categorized by the developer which makes them a little hard to find. There is a "Plugin Manager" also, although I'd avoid it for now, since it seems to be a little slow and has crashed more than once (at least on my machine).
A couple general purpose effects that are worth checking out:
Steve Harris -> Multiband EQ
Steve Harris -> Dyson Compressor
CMT -> FreeVerb
By default these effects are by-passed (meaning, off). Click the Bypass button to make them active. Also to compare the signal, you can toggle back and forth between the original and modified signal.
To adjust the effect setting double click on the effect.
A general rule on E.Q. is: to clean up muddy audio, think of cutting a notch in the spectrum for another sound to live in. Two sounds competing for the same audio space will sound muddy. Alternately, two similar sounds might be separated out by panning left and right respectively.
12. Importing existing wav audio files: The easiest thing IMO is to drag a clip from Gnome's file manager (nautilus) onto a track in ardour. This will import the audio, and then you can move it around.
13. Exporting to wav audio file: Use the Range Markers to define the start and stop of the song. To set the region, click and drag in the "Range Markers" time line:
Then go to:
If you are burning a CD, you can usually just drop the wav files onto the blank CD and burn them. Note though that CD audio is 44100 samples per second, and by default ardour records/exports at 48000.
14. If you want to create an mp3's copies, you can open up a terminal window, and run a command like:
This will create a copy of the wav, in mp3 format. I'm sure there's a graphical front end, but if you understand a little about the terminal it's really easier to use use the command line version for this.
Or you could rip a CD after it is complete.
15. Misc:
That should cover mosts all the basics of multi-track recording on Linux.
After you record a lot of audio takes, those unused files are still on the hard drive wasting space. To compress the size of the project, and delete unused audio, select:
Of course if you plan on doing a lot of multimedia work check out Ubuntu Studio (which is a flavor of Ubuntu optimized for audio/video production).
Also note, you may need to close out ardour when playing wav files off your hard drive (in case it locks down the audio driver).
1. Basic linux setup.
First off, you will need to turn on the audio capture for the "line in" or "microphone in" for your sound card, and of course, plug in your wires. The easiest way to get to the Linux mixer is to double click the little speaker icon at the top bar:

Then go to:
Volume Control -> Preferences
And make sure that "Line In capture" or "Microphone Capture" switches are checked. This will give you additional check box options under the "switches" tab. Make sure at least one of these options are checked.
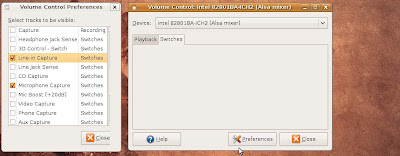
I prefer using "line in capture," taking the the output from a small mackie mixer. This will give you a lot more control over the input signal. Of course you can plug a mic directly in the back of the computer, but depending on the microphone, it might not sound as good.
Also you may want to turn off "line in" for playback, and only enable it for recording. Otherwise, you might heard a slight double hit for every sound, or phase shifting.
As a quick check you can try recording with something simple like Sound Recorder just to verify that the basic wire connections and linux audio settings are basically correct. This will verify that the audio signal is at least going through the sound card.
2. Now from synaptic or apt-get, install:
ardour (multi-track recorder),
jack-rack (a LADSPA effects rack), and
lame (mp3 converter)
In my opinion ardour is probably the best open source multi-track recorder for linux. My second favorite is traverso, although the interface is a little counter intuitive if you are used to something like ardour or cubase.
3. Now close any other programs which may be using the sounds card (like browsers, games, etc). You should be able to start Ardour, under the Applications group "Sound & Video".
Note: by default Ardour has a dark color scheme (which might make it a little hard to see where things are). To change to a lighter color scheme, you can go to (from the top menu bar):
Window -> Theme Manager
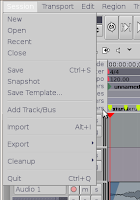
4. Now before you can record anything you need to add a new audio track. This is under
Session -> Add Track/Bus
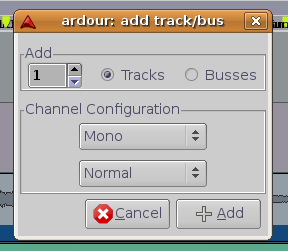
For example:


Then you can select mono or stereo, depending on your input. Pick mono if you don't need stereo .. it will save disk space.
Also what the "Normal" and "Tape" mode means: in normal mode you can record multiple times on the same track. Overlapping clips in the same track are blended together, or can be moved independently. In tape mode, think of a tape recorder with one long continuous piece of tape. Whatever is recorded overwrites whatever was on the track. It's handy when mixing down (or bouncing) multiple tracks to a single stereo track. If you don't want to have to delete audio clips before re-recording.
The rest of the defaults are fine.
5. Now to actually record onto a track, it must be "armed." Otherwise, the tracks are protected from accidentally recording over them. To "arm" the track click on the little red circle on the leftmost end of the track:

Note the slider here controls the volume for playback (for quick mixing).
The "m" button "mutes" the track (during playback)
The "s" button "solos" the track, which is the inverse of mute (meaning you mute everything but that track)
If you press mute and solo together, your machine will blow up. Of course I'm just kidding :)
7. You should now be able to see the recording levels here (to the right of these buttons). If the signal is too loud you will see red clipping. Be sure to adjust the volume levels of the input sound, so that it's not too loud (distorted) or too quiet (not enough signal/noise).
8. Now the recording controls are similar to any standard tape recorder. Click the red circle and triangle to actually start recording onto the armed track. The square stops the recording.
The "|<" returns the play head to the beginning of the recording. Or you can move the play head around with the scrubber (the horizontal slider in the picture above). Or you can click on the timecode to move the play head to a specific location.

9. Basic audio editing: You can trim, change the fade in/out, or move the clips around with the pointer tool selected (the little hand).

This is the default editing selection tool. The "|<->|" icon, next to the hand pointer, is another important mode. It is for selecting time ranges of one or more tracks. For example if you want to cut a whole clip, use the hand. If you want to cut a region out of the clip, use the range selector.
One of the most useful edits is under Edit -> Split Region. It will split a recorded clip into two regions that can be moved independently. Like scissors. Select the tracks of the audio that you want to split. You can select, as a general convention, multiple items by holding down the CTRL key and clicking on the track(s).
Also, note the "Markers" on the time line. Punch in/out and looping is especially handy. If you don't see a "Loop/Punch Ranges" heading in the Markers area, right click, and check "Loop/Punch."
Suppose that 98% of a take is good but contains a mistake in the middle. You can set a range containing the mistake and record only the few seconds of the track within the punch in/out range. This protects the rest of the track from recording over it.
To set up a punch in/out region, drag a region in the time line, and select "Set Punch Range":

Then click the "Punch In" "Punch Out" buttons.

Click on the time line to position the playhead before the mistake. Then record as usual. The only section that will be recorded is the region within the punch markers. Click the punch in/out buttons again to turn off.
These simple edits should give you enough to mix down the "best-of" multiple takes and correct small mistakes.
10. After you record several tracks, you can do a initial mix (volume / pan) in the mixer window under:
Window -> Show Mixer
Mixing is a matter of taste and pretty intuitive I think. The main (vertical) slider controls the volume of each track. The horizontal slider (at bottom) controls the left/right panning. The rest of the defaults should be fine.

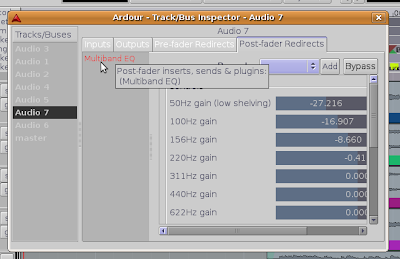
11. Post processing and effects. With jack-rack you can go to:
Window -> Track/Bus Inspector
to look at the routing and add effects to particular tracks. To add an effect to a track, select the audio track (on the left)
Pre-fader and post-fader means the effect is inserted before and after your volume slider control (on the mixing board). To make things easiest, I prefer pre-fader effects, then I can control the overall volume with the fader.
Then right click. You will get the following options:

These are categorized by the developer which makes them a little hard to find. There is a "Plugin Manager" also, although I'd avoid it for now, since it seems to be a little slow and has crashed more than once (at least on my machine).
A couple general purpose effects that are worth checking out:
Steve Harris -> Multiband EQ
Steve Harris -> Dyson Compressor
CMT -> FreeVerb
By default these effects are by-passed (meaning, off). Click the Bypass button to make them active. Also to compare the signal, you can toggle back and forth between the original and modified signal.
To adjust the effect setting double click on the effect.

A general rule on E.Q. is: to clean up muddy audio, think of cutting a notch in the spectrum for another sound to live in. Two sounds competing for the same audio space will sound muddy. Alternately, two similar sounds might be separated out by panning left and right respectively.
12. Importing existing wav audio files: The easiest thing IMO is to drag a clip from Gnome's file manager (nautilus) onto a track in ardour. This will import the audio, and then you can move it around.
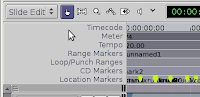
13. Exporting to wav audio file: Use the Range Markers to define the start and stop of the song. To set the region, click and drag in the "Range Markers" time line:

Then go to:
Session -> Export -> Export Range to audiofile
If you are burning a CD, you can usually just drop the wav files onto the blank CD and burn them. Note though that CD audio is 44100 samples per second, and by default ardour records/exports at 48000.
14. If you want to create an mp3's copies, you can open up a terminal window, and run a command like:
lame /path/to/file.wav /path/to/new/file.mp3
This will create a copy of the wav, in mp3 format. I'm sure there's a graphical front end, but if you understand a little about the terminal it's really easier to use use the command line version for this.
Or you could rip a CD after it is complete.
15. Misc:
That should cover mosts all the basics of multi-track recording on Linux.
After you record a lot of audio takes, those unused files are still on the hard drive wasting space. To compress the size of the project, and delete unused audio, select:
Session -> Cleanup
Of course if you plan on doing a lot of multimedia work check out Ubuntu Studio (which is a flavor of Ubuntu optimized for audio/video production).
Also note, you may need to close out ardour when playing wav files off your hard drive (in case it locks down the audio driver).
Thursday, December 4, 2008
SVN -- recursive diffs
It's odd that svn (source control) doesn't have an easy way to see the entire evolution of a file. Since I'm usually wondering how and when something was changed, or just want to see the progression of the changes.
So I just wrote a quick shell script to do this:
So I just wrote a quick shell script to do this:
#!/bin/bash
# 2008 GPL
if [[ $1 == "" ]]
then
echo "SVN RECURSIVE DIFF"
echo ""
echo "This script will list all svn changes to a file"
echo "the first and last file in the repository"
echo "and a series of diffs that connect them."
echo "IE, you can see the complete evolution of the file."
echo "It's probably best to pipe the output to a file."
echo ""
echo "USE"
echo " svnrdiff"
echo ""
echo "EXAMPLE"
echo " svnrdiff Model/ModelExample.cs > somefile.txt"
echo ""
echo "NOTES"
echo ""
echo "If your log is out of date, use"
echo ""
echo " svn up"
echo ""
echo "If you just want to see who last touched a line, use"
echo ""
echo " svn praise"
exit
fi
v1=""
v2=""
show_current="0"
while read log
do
echo ===================================================================
echo $log
echo ===================================================================
# grab revision numbers of file
v1=$( echo $log | sed -e 's/^r//' -e 's/ .*//' -e 's/-//g' )
if [[ $v2 != "" ]]
then
# print succesive diffs
svn diff -r $v2:$v1 $1
show_current="1"
else
# print first file
svn cat -r $v1 $1
fi
v2=$v1
# list in cronological order (tac)
done < <( svn log $1 | grep -E -e "^r[0-9]+ \| " | tac )
# print last file (if haven't already)
echo ===================================================================
echo "Current snapshot:"
echo ===================================================================
if [[ $show_current == "1" ]]
then
svn cat $1
else
echo "Same as above."
fi
Monday, May 19, 2008
Thursday, April 3, 2008
Elephant paints self-portrait
Wow this elephant is terrible. He draws the feet directly on top of the ground rather than inset. Doesn't he know anything about linear perspective???? :)
Friday, March 21, 2008
giant starfish found
From
http://www.cnn.com/2008/TECH/science/03/21/antarctic.search.ap/index.html
 Looks like a giant species of star fish has been found. These guys would look better with faces. I propose that we tattoo faces on all star fish:

http://www.cnn.com/2008/TECH/science/03/21/antarctic.search.ap/index.html
 Looks like a giant species of star fish has been found. These guys would look better with faces. I propose that we tattoo faces on all star fish:
Subscribe to:
Comments (Atom)